Table of Contents
Introduction
OPNsense is an open-source firewall and router platform based on FreeBSD.
It is a fork of pfSense.
I started using from 23.x version and it is very stable and easy to use.
The new version 24.1 was released on February 2024.
Then, I upgraded my OPNsense to 24.1.
BUT!! I had some trouble with the upgrade.
IPv4 gateway was not working after the upgrade.
So, I decided to write a document to help you finish OPNsense Setup For Multiple Public IP.
This document will guide you through the process of setting up OPNsense.
Prerequisites
- Download the latest OPNsense ISO file from the following URL.
- Make sure you have know the arch of your environment. Like below.
Choose a machine
I install OPNsense in my VM platform ESXi, the follow is my setup, FYI.
- Name: opnsense
- CPU: 4
- Memory: 4GB
- Disk: 32GB
- NICs:
- WAN
- LAN
- LAN2
- VMLAN
Boot and Install
If you do not just want live CD, you should use the following user/password
- User: installer
- Password: opnsense
Initial Setup
Assign interfaces(only setup IPv4 for now)
- WAN: vmx1
- LAN: vmx2
- OPT1: vmx3
- OPT2: vmx0
Setup IP address
- WAN:
- IP: 61.216.14.215
- Subnet: 24
- Gateway: 61.216.14.254
- Name Server: 8.8.8.8
- LAN:
- IP: 172.20.20.1
- Subnet: 24
- DHCP:
- Start: 172.20.20.101
- End: 172.20.20.200
- OPT1:
- IP: 172.20.10.1
- Subnet: 24
- DHCP:
- Start: 172.20.10.101
- End: 172.20.10.200
- OPT2:
- IP: 10.0.0.1
- Subnet: 24
- DHCP:
- Start: 10.0.0.101
- End: 10.0.0.200
After the initial setup, access the web interface with the following URL
I will skip the wizard, because most setting I can handle myself.
Setup in Web UI
VMware Tools(Optional)
If you are using ESXi, the first thing is install VMware Tools.
System -> Firmware -> Plugins
Search vmware -> Click + on the os-vmware
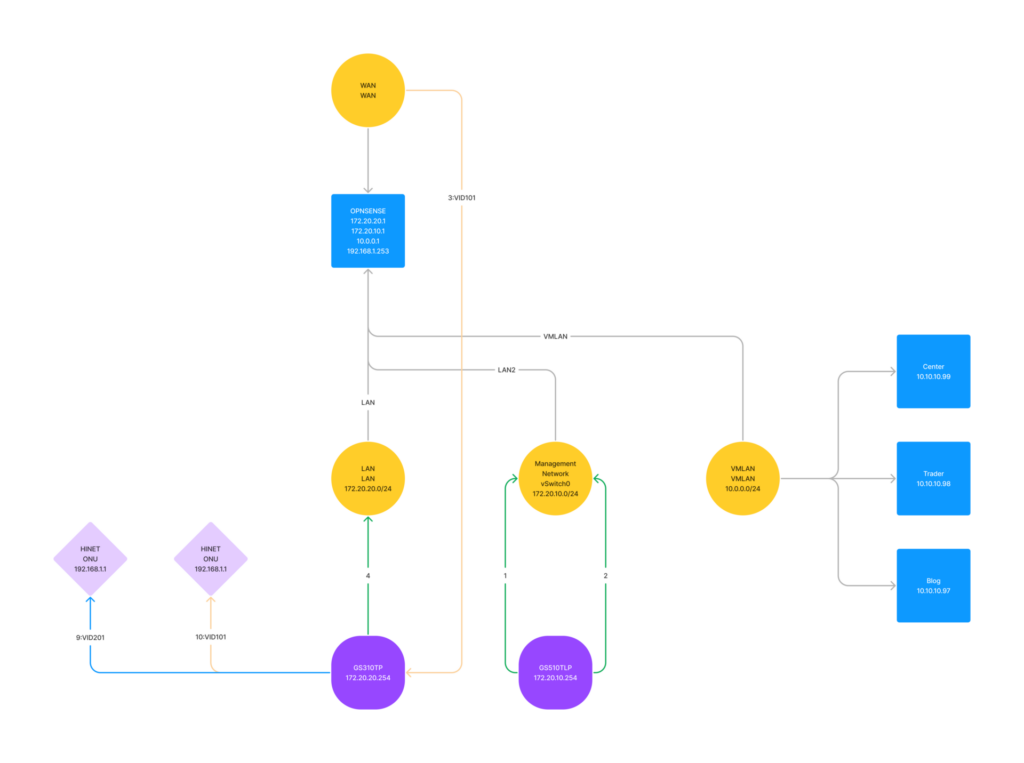
Add Gateways
I would say it is the most important thing in router setup.
No gateway, No internet.
Under System -> Gateways
In my case, I need add a new IPv6 gateway
- Interface: WAN
- Address Family: IPv6
- IP Address: 2001:B030:2049:FF99::FFFF
- Monitor IP: 2001:B000:168::1
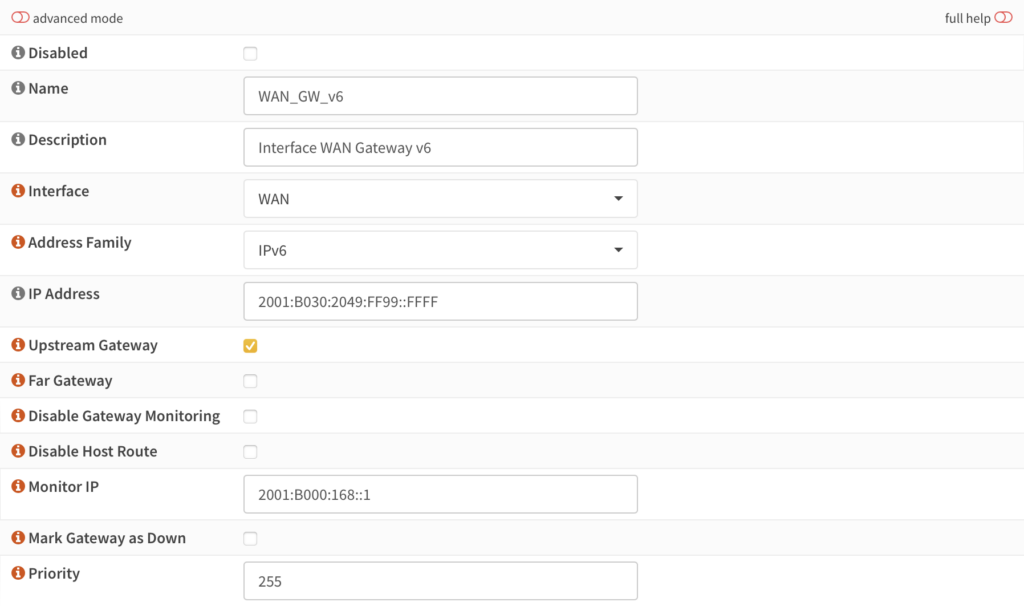
The Upstream Gateway should be checked, if this gateway if for internet.
Uncheck Disable Gateway Monitoring
The deafult Gateway we setup in the intial setting can also be edited this moment.
- Interface: WAN
- Address Family: IPv4
- IP Address: 61.216.14.254
- Monitor IP: 168.95.1.1
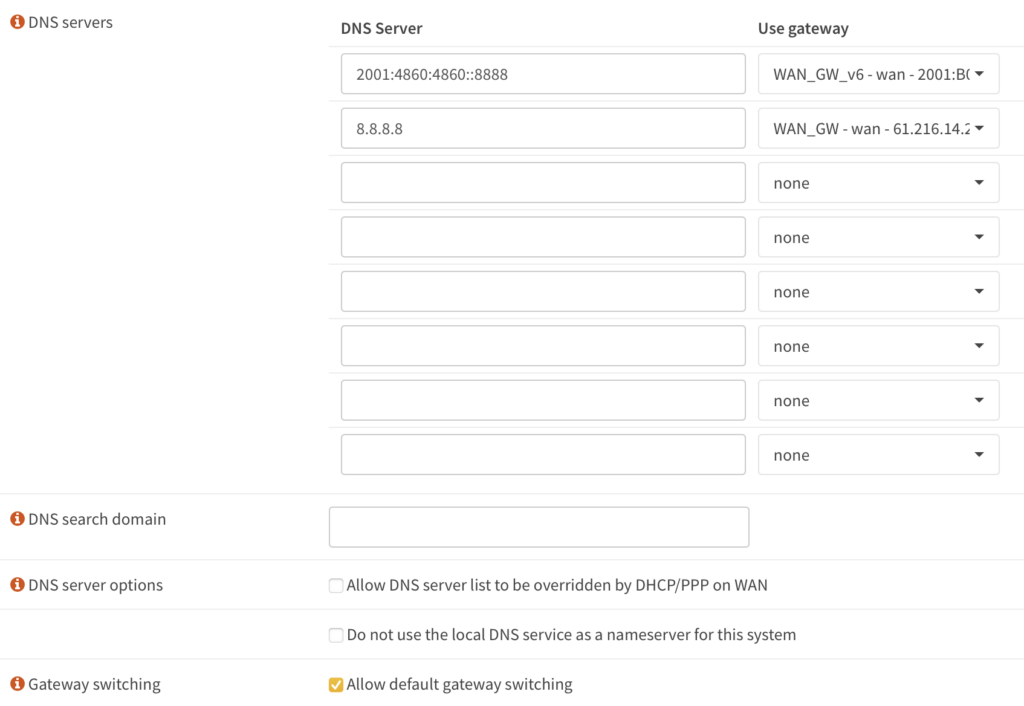
General Settings
- Domain: toc.arpa(It is a local domain, don’t use
local, enter whatever you want) - DNS Servers:
- 2001:4860:4860::8888 -> GW_v6
- 8.8.8.8 -> GW_v4
Setup Interfaces IP Address
In this part, if your ISP does not provide IPv6, and you do not need using IPv6 in local network, then jus skip.
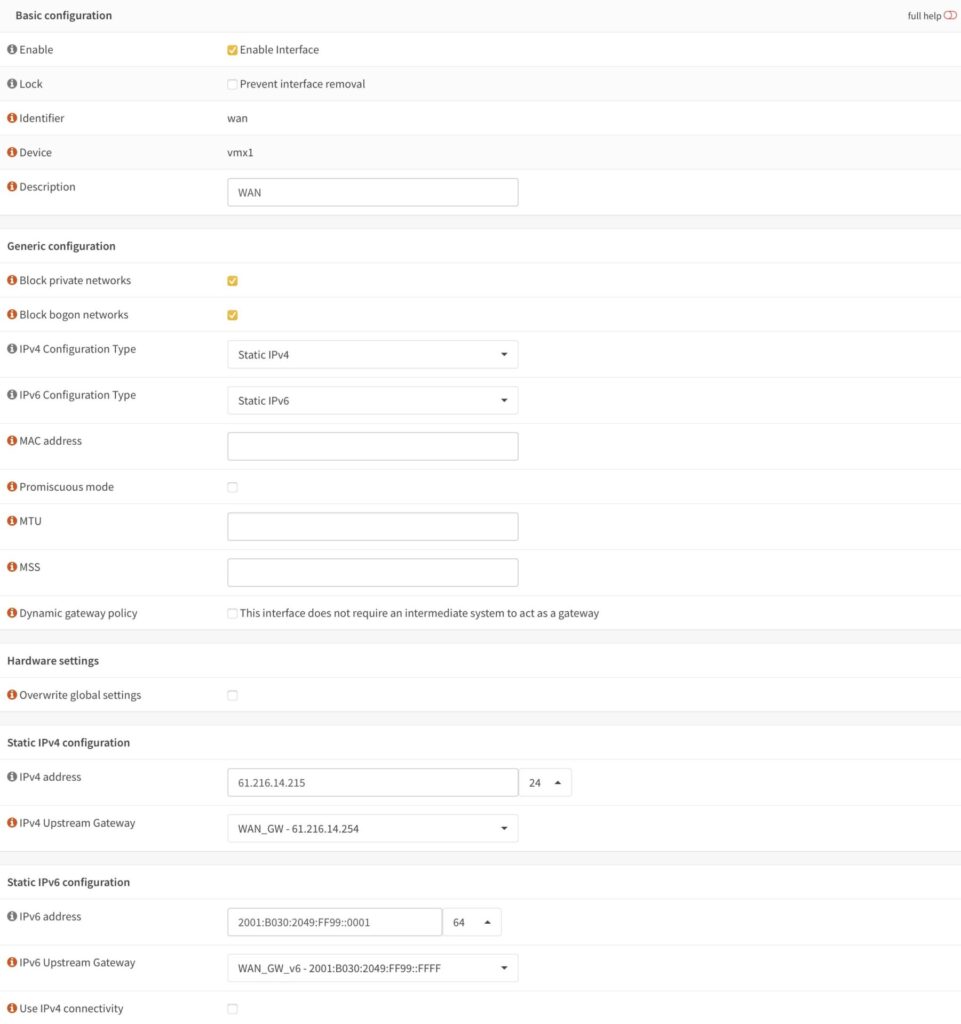
WAN
Fill the Description with WAN
Change the IPv6 Configuration Type to Static IPv6
- IPv6 address: 2001:B030:2049:FF99::0001/64
- IPv6 Upstream Gateway: GW_v6
IPv4 Upstream Gateway should setup correctly now, because we have multiple gateway now.
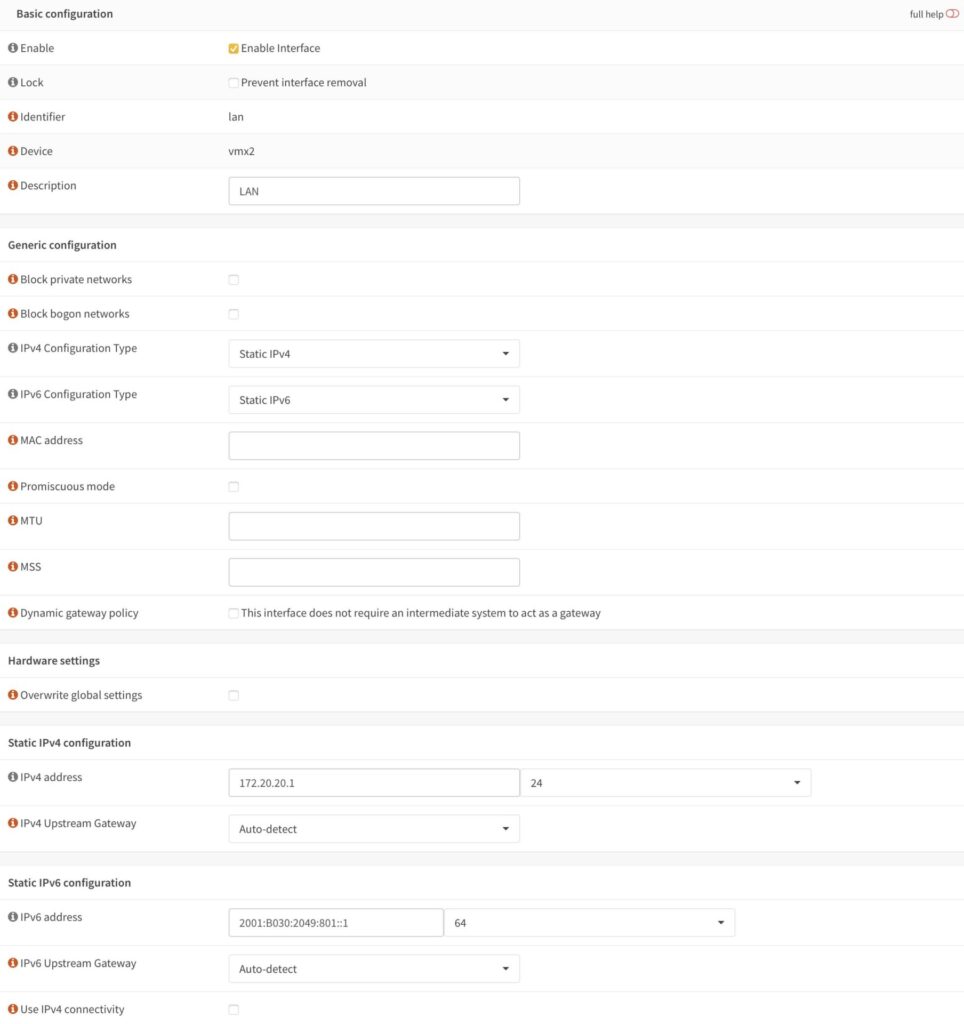
LAN
Before start, you can refer this old post, but in Chinese
Fill the Description with LAN
Change the IPv6 Configuration Type to Static IPv6
- IPv6 address: 2001:B030:2049:801::1/64
- IPv6 Upstream Gateway: Auto-detect
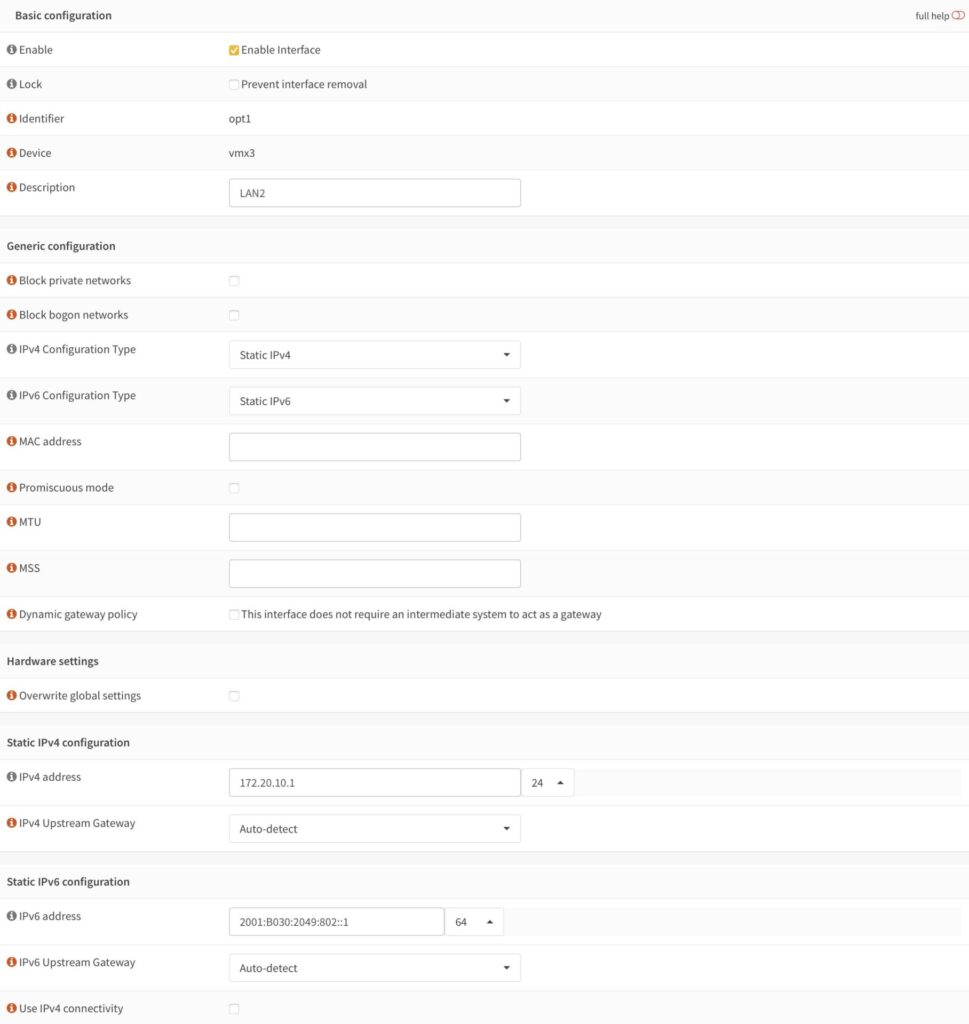
OPT1
Fill the Description with LAN2, it will show for most case, including left draw.
Change the IPv6 Configuration Type to Static IPv6
- IPv6 address: 2001:B030:2049:802::1/64
- IPv6 Upstream Gateway: Auto-detect
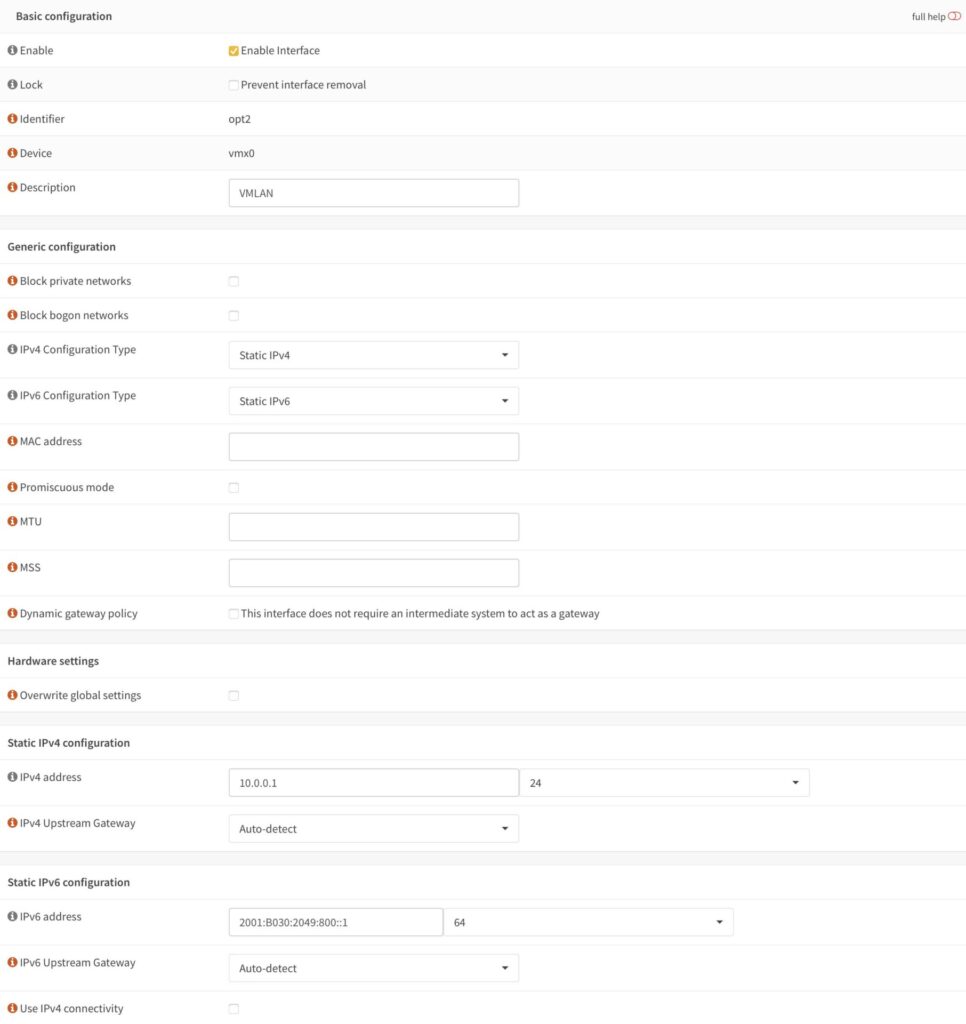
OPT2
Fill the Description with VMLAN
Change the IPv6 Configuration Type to Static IPv6
- IPv6 address: 2001:B030:2049:800::1/64
- IPv6 Upstream Gateway: Auto-detect
DHCP
Services -> ISC DHCPv4
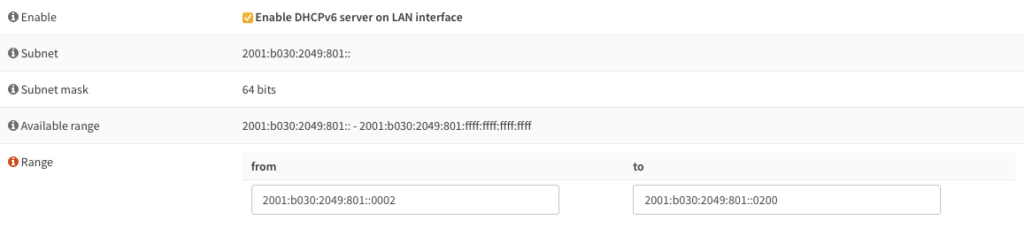
LAN
- IPv4 Range: 172.20.20.101 ~ 172.20.20.200
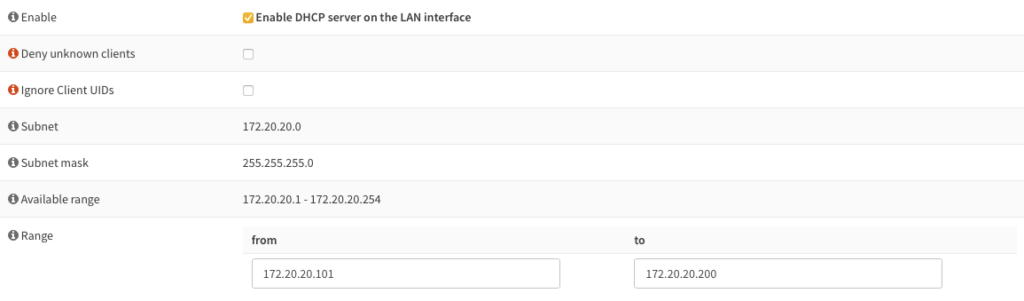
- IPv6 Range: 2001:b030:2049:801::0002 ~ 2001:b030:2049:801::0200
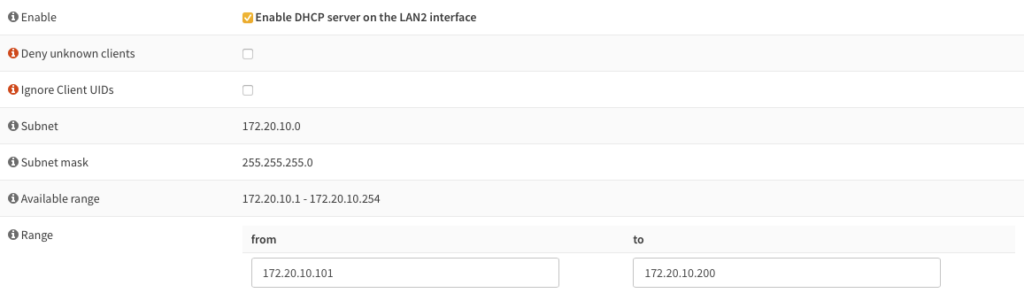
LAN2
- IPv4 Range: 172.20.10.101 ~ 172.20.10.200
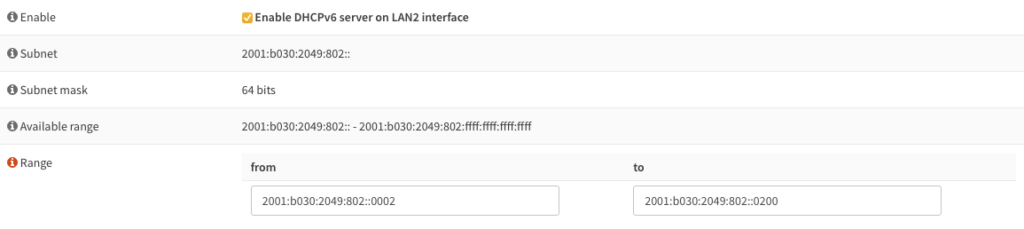
- IPv6 Range: 2001:b030:2049:802::0002 ~ 2001:b030:2049:802::0200
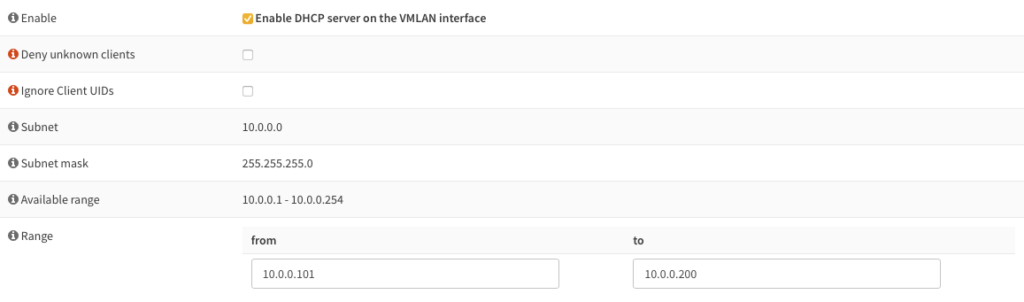
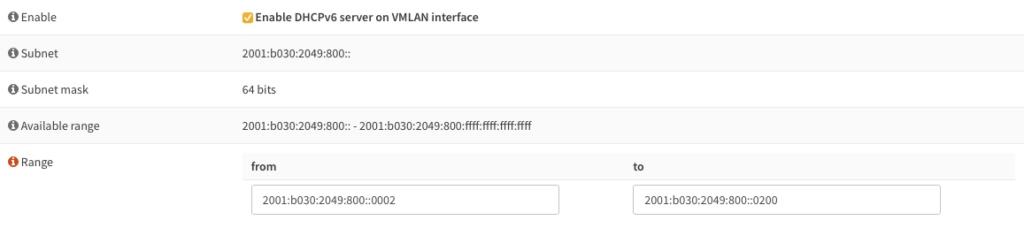
VMLAN
- IPv4 Range: 10.0.0.101 ~ 10.0.0.200
- IPv6 Range: 2001:b030:2049:800::0002 ~ 2001:b030:2049:800::0200
Router Advertisements for IPv6
Set Router Advertisements to Stateless for LAN, LAN2, and VMLAN

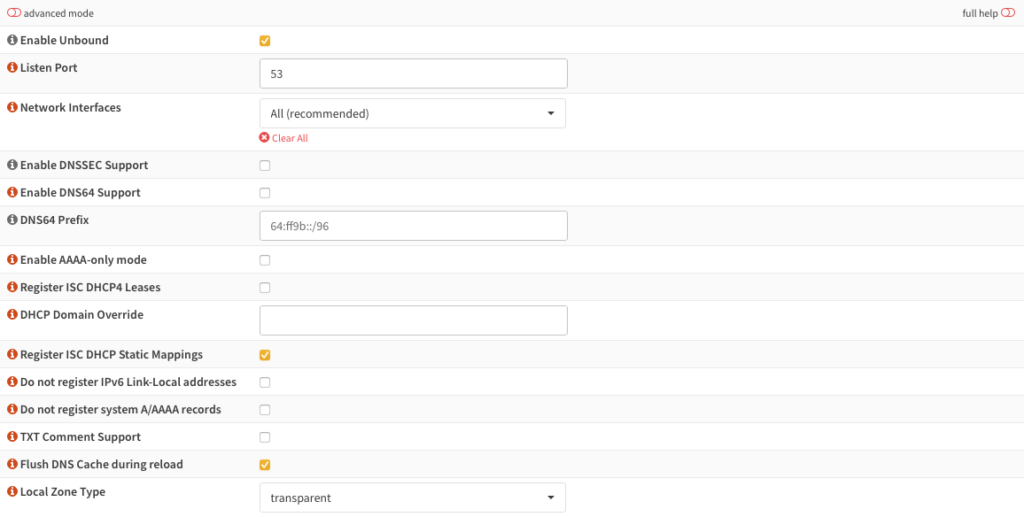
DNS Server(Unbound DNS)
OPNsense provides Dnsmasq DNS and Unbound DNS for us.
I choose Unbound DNS just only because it is the default setting.
- Check
Register ISC DHCP Static Mappingsto enable access hosts in local domain.
root@hb:~# ping blog.toc.arpa
PING blog.toc.arpa (10.0.0.97) 56(84) bytes of data.
64 bytes from blog.toc.arpa (10.0.0.97): icmp_seq=1 ttl=63 time=0.175 ms
64 bytes from blog.toc.arpa (10.0.0.97): icmp_seq=2 ttl=63 time=0.153 ms
64 bytes from blog.toc.arpa (10.0.0.97): icmp_seq=3 ttl=63 time=0.206 ms- Check
Flush DNS Cache during reloadto make sure the dns record is latest after reboot or reload.
Virtual IPs
OPNsense Setup For Multiple Public IP is this post’s title, for people just only has 1 public IP, just skip.
The easiest way to add multiple public IP(WAN IP) in OPNsense is add more WAN interfaces.
But if we have 8 public ip, so adding 8 interfaces? Not likely the best resolution, except these 8 public ip come from different ISP or different line.
In most cases, 2 or 6 public ip will share same bandwidth from single ISP, so using Virtaul IPs will be the best resolution.
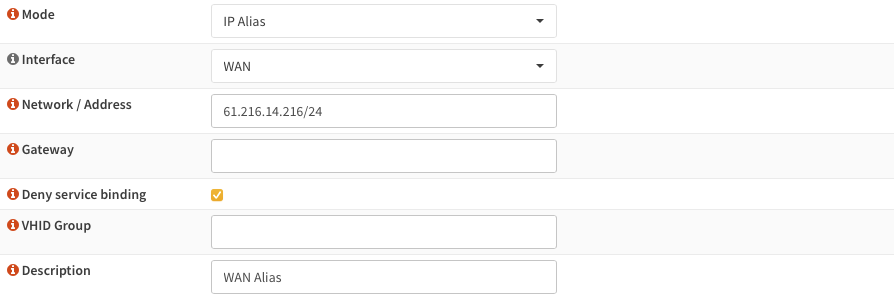
Interfaces -> Virtaul IPs
- Network/Address: 61.216.14.216/24
- Gateway: keep empty
- Deny service binding must be check.
Firewall
NAT
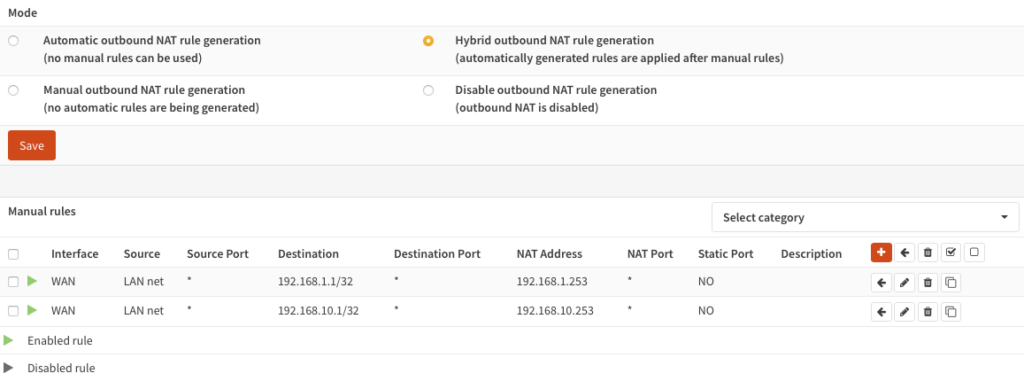
Outbound
If you also want to access your ISP modem, follow this screenshot.
Advanced Setting
Reflection for portforwards let us can access public in the local network.Automatic outbound NAT for Reflectionis needed when there mulitple subnet.

Rules
OPNsense will setup out direction for default LAN. So the extra subnet, we should setup ourself.
LAN2

VMLAN

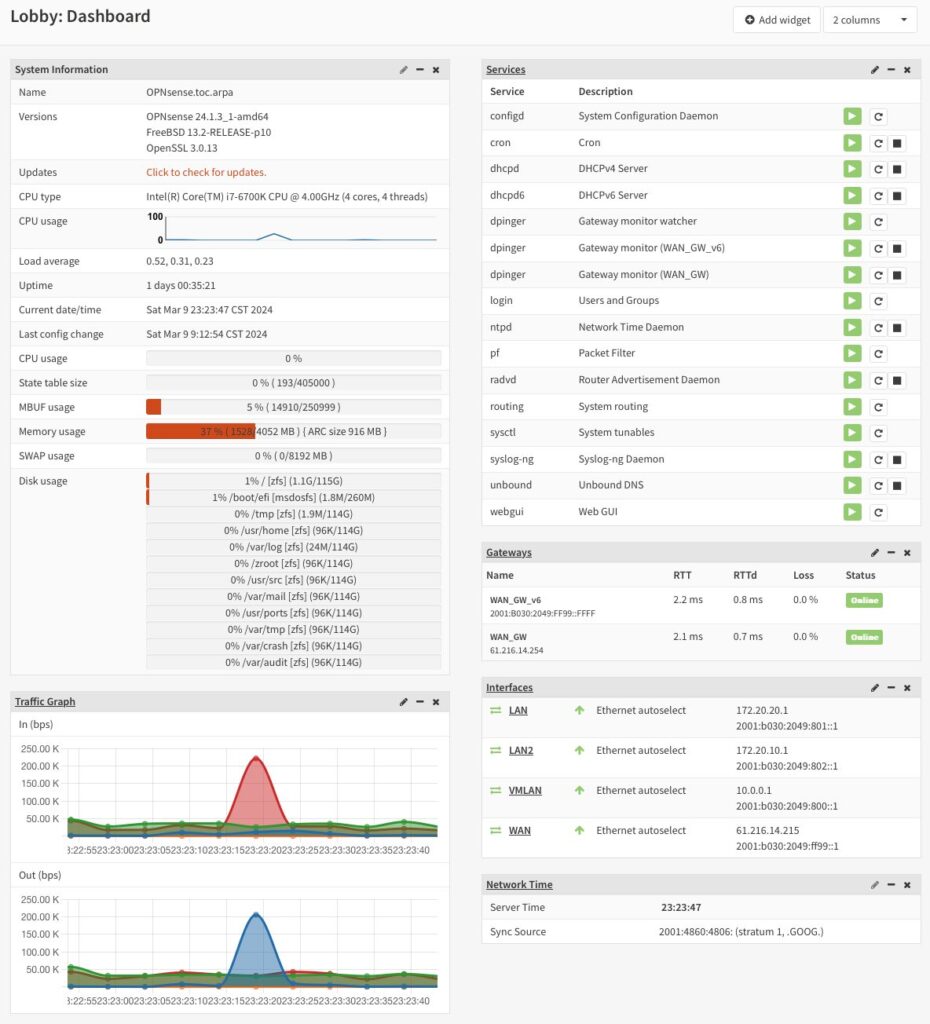
Back to Lobby
After your setup, lobby should look like below.