Table of Contents
前言
這篇記錄一下 Let’s Encrypt 申請過程
在本站開篇有大概帶到
不過當時是用 Macvlan
我覺得並沒有幫助到太多人
但這篇會以使用 Docker Bridge Network 為主
如果你跟我一樣,不想在系統上裝額外的程式
那這篇文章應該可以符合你的需求
Let’s Encrypt
不免俗,還是要來介紹一下 Let's Encrypt
免費!
我想大部分會點進來這篇文章的
應該都是開發者居多
在這當中,應該有大部分人只是為了自己的某個服務需要 SSL 憑證
所以如果為了這個去購入一個昂貴的憑證
好像有點說不過去
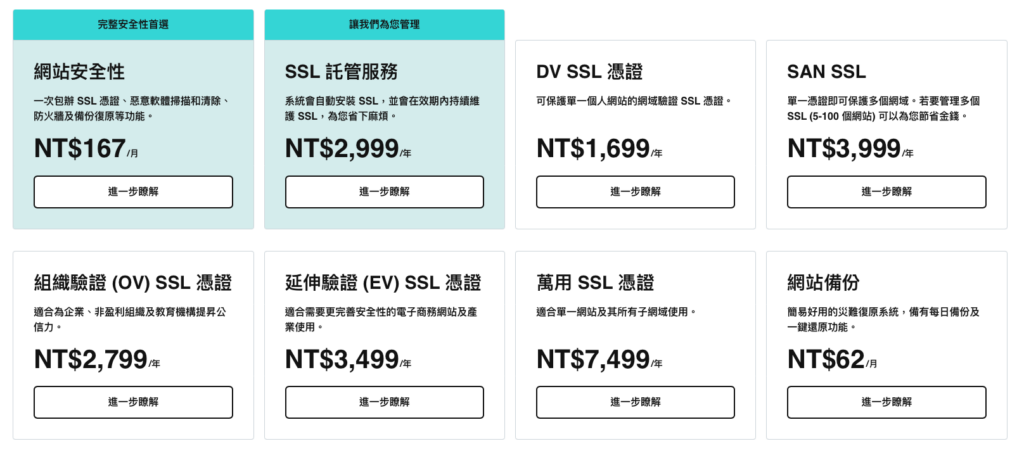
下面提供一下某 Daddy 的價格
不是說非常便宜😂
前置條件
- 系統:
Linux - 環境:
Dockercurl
- 網路:
- 擁有一個
Domain - 上述的
Domain的Port 80, Port 443可以指向這台設備
- 擁有一個
開始申請
Step 1. 決定憑證存放路徑
cert_path="./certbot_data"

mkdir -p $cert_path/www
mkdir -p $cert_path/conf
這邊可以依照需求更改
筆者這邊就簡單的放在當前路徑的 certbot_data
Step 2. 停止當前存在的 nginx, certbot (選擇性)
這步不是必須的
如果可以確保目前系統是乾淨的
那就不用特別跑這段
docker stop nginx
docker stop certbot
docker system prune --volumes -f
Step 3. 建立驗證用 nginx config
domain_name="trader.tocraw.com"

echo "server {
    listen 80;
    listen [::]:80;
    server_name ${domain_name};

    location /.well-known/acme-challenge/ {
        root /var/www/certbot;
    }
}" >nginx_validate.conf
建立完成之後
就可以把我們的 nginx 啟動
不過在執行之前
請確認你使用的 Docker network 的 brdige 還存在
如果你沒有做過任何異動,那高機率這個還是會在
docker network lsNETWORK ID NAME DRIVER SCOPE
a6073c8f0426 bridge bridge local
291efd1a7773 host host local
beb5f26e80e7 none null local你也可以用 host, macvlan 這類的網路
只要確定 domain 可以指向這個容器即可
docker run -d --rm \
    --name nginx \
    -p 80:80 \
    -v $(pwd)/nginx_validate.conf:/etc/nginx/conf.d/nginx_validate.conf:ro \
    -v $cert_path/www:/var/www/certbot/:ro \
    -v $cert_path/conf:/etc/nginx/ssl/:ro \
    nginx:latest
來看一下這個容器的 log
沒有報錯~
docker logs -f nginx/docker-entrypoint.sh: /docker-entrypoint.d/ is not empty, will attempt to perform configuration
/docker-entrypoint.sh: Looking for shell scripts in /docker-entrypoint.d/
/docker-entrypoint.sh: Launching /docker-entrypoint.d/10-listen-on-ipv6-by-default.sh
10-listen-on-ipv6-by-default.sh: info: Getting the checksum of /etc/nginx/conf.d/default.conf
10-listen-on-ipv6-by-default.sh: info: Enabled listen on IPv6 in /etc/nginx/conf.d/default.conf
/docker-entrypoint.sh: Sourcing /docker-entrypoint.d/15-local-resolvers.envsh
/docker-entrypoint.sh: Launching /docker-entrypoint.d/20-envsubst-on-templates.sh
/docker-entrypoint.sh: Launching /docker-entrypoint.d/30-tune-worker-processes.sh
/docker-entrypoint.sh: Configuration complete; ready for start up
2023/10/18 03:43:25 [notice] 1#1: using the "epoll" event method
2023/10/18 03:43:25 [notice] 1#1: nginx/1.25.2
2023/10/18 03:43:25 [notice] 1#1: built by gcc 12.2.0 (Debian 12.2.0-14)
2023/10/18 03:43:25 [notice] 1#1: OS: Linux 5.15.82-0-virt
2023/10/18 03:43:25 [notice] 1#1: getrlimit(RLIMIT_NOFILE): 1048576:1048576
2023/10/18 03:43:25 [notice] 1#1: start worker processes
2023/10/18 03:43:25 [notice] 1#1: start worker process 30
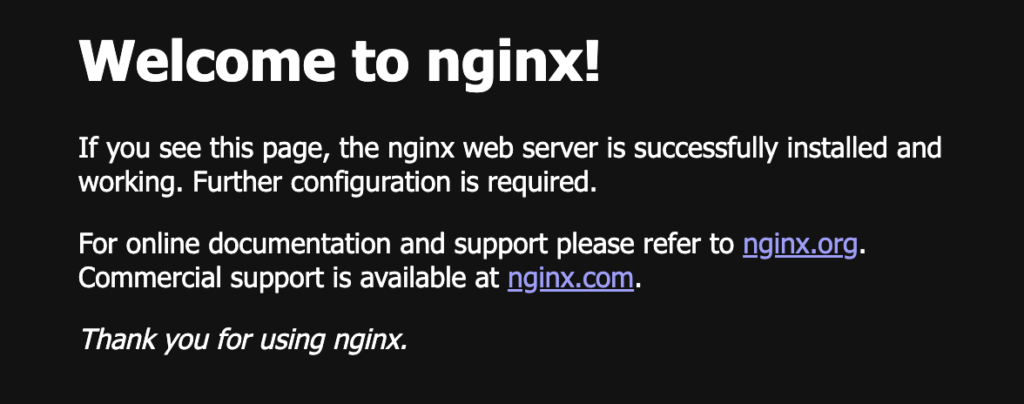
2023/10/18 03:43:25 [notice] 1#1: start worker process 31然後就可以訪問看看這台機器的 Port 80
應該要看到以下畫面
這邊需要停一下來說明一下為什麼是驗證用(nginx_validate.conf)
很顯然,這個不會是最終正式環境用的 config
裡面只監聽 Port 80
也沒有帶入憑證(因為我們的目的就是申請憑證,當然還沒有憑證)
所以這個使用這個驗證用 config 的 nginx,一通過驗證,他的任務就達成
就會被關閉
Step 4. 驗證
在這個階段,要啟動到第二個容器
就是 certbot
What’s Certbot?
Certbot is a free, open source software tool for automatically using Let’s Encryptcertificates on manually-administrated websites to enable HTTPS.
Certbot is made by the Electronic Frontier Foundation (EFF), a 501(c)3 nonprofit based in San Francisco, CA, that defends digital privacy, free speech, and innovation.
https://certbot.eff.org/pages/about
這是一個命令列工具
可以協助使用者省去跟 Let’s Encrypt 交互驗證的過程
下面是 certbot 官方提供的安裝方法
不知道各位怎麼想
如果你本來就是 snap 的使用者
也就是多安裝一個套件
但我是不喜歡又在系統安裝另一套
所以這邊我會選擇使用 Docker
與其說使用 Docker,不如說是借用容器裡面的 binary
這樣省去安裝的步驟
來簡單的示例一下
先用下面的指令看一下 certbot 的 help
docker run --rm --name certbot certbot/certbot:latest --help- - - - - - - - - - - - - - - - - - - - - - - - - - - - - - - - - - - - - - - -
certbot [SUBCOMMAND] [options] [-d DOMAIN] [-d DOMAIN] ...
Certbot can obtain and install HTTPS/TLS/SSL certificates. By default,
it will attempt to use a webserver both for obtaining and installing the
certificate. The most common SUBCOMMANDS and flags are:
obtain, install, and renew certificates:
(default) run Obtain & install a certificate in your current webserver
certonly Obtain or renew a certificate, but do not install it
renew Renew all previously obtained certificates that are near
expiry
enhance Add security enhancements to your existing configuration
-d DOMAINS Comma-separated list of domains to obtain a certificate for
(the certbot apache plugin is not installed)
--standalone Run a standalone webserver for authentication
(the certbot nginx plugin is not installed)
--webroot Place files in a server's webroot folder for authentication
--manual Obtain certificates interactively, or using shell script
hooks
-n Run non-interactively
--test-cert Obtain a test certificate from a staging server
--dry-run Test "renew" or "certonly" without saving any certificates
to disk
manage certificates:
certificates Display information about certificates you have from Certbot
revoke Revoke a certificate (supply --cert-name or --cert-path)
delete Delete a certificate (supply --cert-name)
reconfigure Update a certificate's configuration (supply --cert-name)
manage your account:
register Create an ACME account
unregister Deactivate an ACME account
update_account Update an ACME account
show_account Display account details
--agree-tos Agree to the ACME server's Subscriber Agreement
-m EMAIL Email address for important account notifications
More detailed help:
-h, --help [TOPIC] print this message, or detailed help on a topic;
the available TOPICS are:
all, automation, commands, paths, security, testing, or any of the
subcommands or plugins (certonly, renew, install, register, nginx,
apache, standalone, webroot, etc.)
-h all print a detailed help page including all topics
--version print the version number
- - - - - - - - - - - - - - - - - - - - - - - - - - - - - - - - - - - - - - - -前面一直沒有說明到,今天目的只是為了申請憑證
而 certbot 是有提供方法申請並且安裝到你的 apache 或者 nginx
不過我通常只會申請而不會安裝
看完說明,來組組看 command
下面列出我拿來使用的 subcommand
certonly: Obtain or renew a certificate, but do not install it-n: Run non-interactively--agree-tos: Agree to the ACME server’s Subscriber Agreement--webroot: Place files in a server’s webroot folder for authentication--webroot-path: public_html / webroot path
-m: Email address for important account notifications
其中 --webroot-path 並沒有秀在基本的 help 當中
可以透過下面的指令看到
docker run --rm --name certbot certbot/certbot:latest -h all

# 或者只想看到 webroot 的進階 help
docker run --rm --name certbot certbot/certbot:latest -h webroot
webroot:
Saves the necessary validation files to a .well-known/acme-challenge/
directory within the nominated webroot path. A seperate HTTP server must
be running and serving files from the webroot path. HTTP challenge only
(wildcards not supported).
--webroot-path WEBROOT_PATH, -w WEBROOT_PATH
public_html / webroot path. This can be specified
multiple times to handle different domains; each
domain will have the webroot path that preceded it.
For instance: `-w /var/www/example -d example.com -d
www.example.com -w /var/www/thing -d thing.net -d
m.thing.net` (default: Ask)
--webroot-map WEBROOT_MAP
JSON dictionary mapping domains to webroot paths; this
implies -d for each entry. You may need to escape this
from your shell. E.g.: --webroot-map
'{"eg1.is,m.eg1.is":"/www/eg1/", "eg2.is":"/www/eg2"}'
This option is merged with, but takes precedence over,
-w / -d entries. At present, if you put webroot-map in
a config file, it needs to be on a single line, like:
webroot-map = {"example.com":"/var/www"}. (default:
{})說明結束
來看看最終組起來的樣子
docker run --rm \
    --name certbot \
    -v $cert_path/www:/var/www/certbot/:rw \
    -v $cert_path/conf:/etc/letsencrypt/:rw \
    certbot/certbot:latest certonly \
    -v \
    -n \
    --agree-tos \
    --webroot \
    --webroot-path /var/www/certbot/ \
    -m [email protected] \
    -d $domain_name
執行看看
如果沒有意外,應該會是一步完成
中間沒有任何的交互
Saving debug log to /var/log/letsencrypt/letsencrypt.log
Plugins selected: Authenticator webroot, Installer None
Account registered.
Requesting a certificate for trader.tocraw.com
Performing the following challenges:
http-01 challenge for trader.tocraw.com
Using the webroot path /var/www/certbot for all unmatched domains.
Waiting for verification...
Cleaning up challenges

Successfully received certificate.
Certificate is saved at: /etc/letsencrypt/live/trader.tocraw.com/fullchain.pem
Key is saved at:         /etc/letsencrypt/live/trader.tocraw.com/privkey.pem
This certificate expires on 2024-01-16.
These files will be updated when the certificate renews.

NEXT STEPS:
- The certificate will need to be renewed before it expires. Certbot can automatically renew the certificate in the background, but you may need to take steps to enable that functionality. See https://certbot.org/renewal-setup for instructions.

- - - - - - - - - - - - - - - - - - - - - - - - - - - - - - - - - - - - - - - -
If you like Certbot, please consider supporting our work by:
 * Donating to ISRG / Let's Encrypt:   https://letsencrypt.org/donate
 * Donating to EFF:                    https://eff.org/donate-le
- - - - - - - - - - - - - - - - - - - - - - - - - - - - - - - - - - - - - - - -
看起來是成功了
我們用 openssl 來讀看看
openssl x509 -in ./certbot_data/conf/live/${domain_name}/fullchain.pem -text -nooutCertificate:
Data:
Version: 3 (0x2)
Serial Number:
03:b9:ef:99:e8:c5:91:c1:48:86:31:90:bf:92:06:e5:69:72
Signature Algorithm: sha256WithRSAEncryption
Issuer: C = US, O = Let's Encrypt, CN = R3
Validity
Not Before: Oct 18 04:43:24 2023 GMT
Not After : Jan 16 04:43:23 2024 GMT
Subject: CN = trader.tocraw.com
Subject Public Key Info:
Public Key Algorithm: id-ecPublicKey
Public-Key: (256 bit)
pub:
04:52:48:0d:2f:9c:5f:51:73:19:6a:55:c0:7c:41:
6e:ab:7d:9e:06:f8:e1:5e:4c:16:33:f3:1f:0b:ad:
a6:8b:3b:4a:77:1d:ae:50:5a:d8:39:e0:5e:5b:15:
1f:ac:36:cb:68:5c:76:4c:71:ec:c1:9f:f1:7b:0a:
56:ce:dc:6b:0f
ASN1 OID: prime256v1
NIST CURVE: P-256
X509v3 extensions:
X509v3 Key Usage: critical
Digital Signature
X509v3 Extended Key Usage:
TLS Web Server Authentication, TLS Web Client Authentication
X509v3 Basic Constraints: critical
CA:FALSE
X509v3 Subject Key Identifier:
0C:4B:99:D7:4E:ED:EC:C8:AD:F5:44:83:33:55:99:16:CD:57:C1:E9
X509v3 Authority Key Identifier:
14:2E:B3:17:B7:58:56:CB:AE:50:09:40:E6:1F:AF:9D:8B:14:C2:C6
Authority Information Access:
OCSP - URI:http://r3.o.lencr.org
CA Issuers - URI:http://r3.i.lencr.org/
X509v3 Subject Alternative Name:
DNS:trader.tocraw.com
X509v3 Certificate Policies:
Policy: 2.23.140.1.2.1
CT Precertificate SCTs:
Signed Certificate Timestamp:
Version : v1 (0x0)
Log ID : 3B:53:77:75:3E:2D:B9:80:4E:8B:30:5B:06:FE:40:3B:
67:D8:4F:C3:F4:C7:BD:00:0D:2D:72:6F:E1:FA:D4:17
Timestamp : Oct 18 05:43:24.279 2023 GMT
Extensions: none
Signature : ecdsa-with-SHA256
30:45:02:21:00:B3:9C:FF:66:4D:C6:52:88:43:C0:73:
C2:EB:64:FE:A7:3F:1D:C2:89:44:65:69:49:22:6D:94:
00:7F:20:D5:FC:02:20:48:17:E5:B6:66:36:5B:70:08:
C3:95:AC:EF:03:E9:CB:D2:EB:65:9A:26:FB:F9:A7:9B:
6A:A9:30:E4:88:F8:CB
Signed Certificate Timestamp:
Version : v1 (0x0)
Log ID : DA:B6:BF:6B:3F:B5:B6:22:9F:9B:C2:BB:5C:6B:E8:70:
91:71:6C:BB:51:84:85:34:BD:A4:3D:30:48:D7:FB:AB
Timestamp : Oct 18 05:43:24.298 2023 GMT
Extensions: none
Signature : ecdsa-with-SHA256
30:45:02:21:00:80:F7:C6:E6:B6:DB:2E:7B:53:1D:35:
22:67:81:F5:1A:0D:D1:57:F6:9C:CD:F0:40:57:40:6E:
B6:87:D0:21:BD:02:20:75:D5:FC:A1:2B:E9:28:4D:71:
8E:55:8D:F7:C4:CD:A2:10:EE:31:83:FD:8E:99:D1:7E:
3B:30:F1:E7:CA:F0:BF
Signature Algorithm: sha256WithRSAEncryption
Signature Value:
ad:e9:8d:fe:2b:9c:92:30:e1:11:8c:b0:ed:28:99:ba:b9:6e:
65:cc:a3:c7:e0:41:96:76:8e:98:ff:8f:20:36:90:3b:c4:09:
c9:8b:e1:d6:03:7d:31:7b:c4:b8:63:3e:3b:b1:2f:84:62:5f:
5c:ee:b9:86:88:70:90:ce:14:a0:b3:b8:af:87:fa:ba:05:66:
15:b6:a1:cd:c3:ff:56:24:f2:c9:16:d0:f1:6f:29:16:b7:62:
c3:84:79:51:f8:e0:92:28:1f:a5:d7:c6:72:76:1b:a2:2d:1e:
2a:16:ce:e8:92:77:95:52:ac:5a:24:8f:c4:65:30:c8:01:6c:
36:73:fb:f2:4e:8d:b0:21:fd:5c:a5:33:25:18:70:fd:31:de:
28:5e:7b:96:8d:a5:6e:7d:0f:65:e0:1f:39:80:43:13:bb:fa:
37:c1:f8:c4:8b:87:20:59:7b:ba:5f:56:c5:a1:80:b8:5b:9e:
cc:7a:3f:bd:b9:5d:53:15:00:dc:a4:c6:fa:b5:0f:8a:f1:09:
01:c4:10:9d:68:f8:ce:88:75:a4:e0:55:6d:d5:35:38:ab:33:
6f:67:75:98:20:75:b1:e8:93:b4:14:c1:59:fc:79:dc:45:80:
57:a1:a3:45:a7:19:b6:fb:d0:bf:ea:54:d9:4b:0d:b2:2d:54:
8c:de:a4:81跟 certbot 回應的一樣
是一張 2024-01-16 到期的憑證
至此已經成功申請完了
最終我們需要的就是 fullchain.pem 以及 privkey.pem
分別是憑證以及私鑰
nginx 示範
剛剛申請完了
現在來跑跑看,以下的 config 可以參考【資安】Mozilla 教你設定 SSL(nginx, Apache, MySQL…)
echo "server {
    listen 80 default_server;
    listen [::]:80 default_server;

    location /.well-known/acme-challenge/ {
        root /var/www/certbot;
    }

    location / {
        return 301 https://\$host\$request_uri;
    }
}

server {
    listen 443 ssl http2;
    listen [::]:443 ssl http2;

    ssl_certificate /etc/nginx/ssl/live/${domain_name}/fullchain.pem;
    ssl_certificate_key /etc/nginx/ssl/live/${domain_name}/privkey.pem;
    ssl_session_timeout 1d;
    ssl_session_cache shared:MozSSL:10m;
    ssl_session_tickets off;

    ssl_dhparam /etc/nginx/ssl/live/${domain_name}/dhparam;

    ssl_protocols TLSv1.2 TLSv1.3;
    ssl_ciphers ECDHE-ECDSA-AES128-GCM-SHA256:ECDHE-RSA-AES128-GCM-SHA256:ECDHE-ECDSA-AES256-GCM-SHA384:ECDHE-RSA-AES256-GCM-SHA384:ECDHE-ECDSA-CHACHA20-POLY1305:ECDHE-RSA-CHACHA20-POLY1305:DHE-RSA-AES128-GCM-SHA256:DHE-RSA-AES256-GCM-SHA384:DHE-RSA-CHACHA20-POLY1305;
    ssl_prefer_server_ciphers off;

    add_header Strict-Transport-Security "max-age=63072000" always;

    ssl_stapling on;
    ssl_stapling_verify on;

    ssl_trusted_certificate /etc/nginx/ssl/live/${domain_name}/chain.pem;
    resolver 8.8.8.8;
}" >nginx_prod.conf
其中比較重要的是下面這段還是得繼續存在
如果這個憑證會需要使用三個月以上
並且有任何原因不能夠被替換
那就得保持這個路由暢通,讓下一段的更新可以運行
location /.well-known/acme-challenge/ {
    root /var/www/certbot;
}
然後試著運行 nginx
記得多 publish 一個額外的 Port 443
docker run -d --rm \
    --name nginx \
    -p 80:80 \
    -p 443:443 \
    -v $(pwd)/nginx_prod.conf:/etc/nginx/conf.d/nginx_prod.conf:ro \
    -v $cert_path/www:/var/www/certbot/:ro \
    -v $cert_path/conf:/etc/nginx/ssl/:ro \
    nginx:latest
然後我們用瀏覽器看看

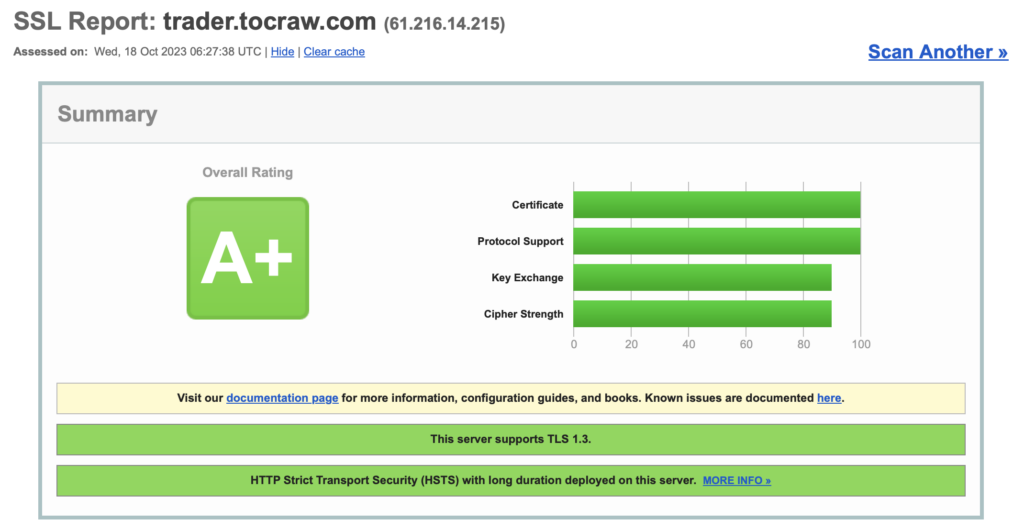
成功了~
確實是剛剛那張,2024-01-16 到期的憑證
而且有搭配 Mozilla 生成器的配置
這東西還是交給專業的
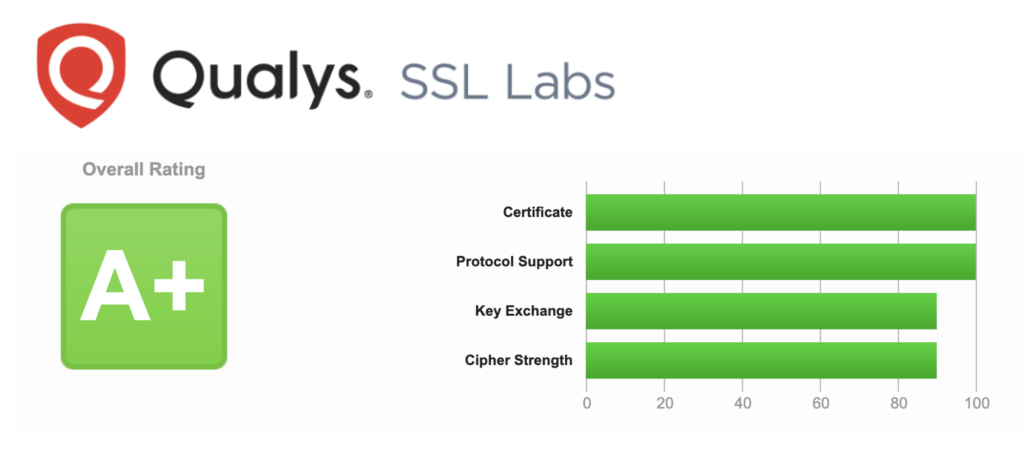
來順便到這邊測一下分數
更新憑證
更新也很簡單
只要確定 /.well-known/acme-challenge/ 這個路由還在
就可以直接執行下面這段
cert_path="./certbot_data"
docker run --rm \
    --name certbot \
    -v $cert_path/www:/var/www/certbot/:rw \
    -v $cert_path/conf:/etc/letsencrypt/:rw \
    certbot/certbot:latest renew
但如果現在直接執行
會看到下面這樣的 log
Saving debug log to /var/log/letsencrypt/letsencrypt.log

- - - - - - - - - - - - - - - - - - - - - - - - - - - - - - - - - - - - - - - -
Processing /etc/letsencrypt/renewal/trader.tocraw.com.conf
- - - - - - - - - - - - - - - - - - - - - - - - - - - - - - - - - - - - - - - -
Certificate not yet due for renewal

- - - - - - - - - - - - - - - - - - - - - - - - - - - - - - - - - - - - - - - -
The following certificates are not due for renewal yet:
  /etc/letsencrypt/live/trader.tocraw.com/fullchain.pem expires on 2024-01-16 (skipped)
No renewals were attempted.
- - - - - - - - - - - - - - - - - - - - - - - - - - - - - - - - - - - - - - - -
看得出來,並沒有被更新到
因為 Let's Encrypt 有限制需要在憑證到期日一個月內才能執行更新
以這張憑證來說,就是 2023-12-16 以後才能更新
總結
感謝各位看到這邊
這篇比起上一次寫 Let's Encrypt
應該要更詳細了一些
也強化了我自己對這段的認識
希望有幫助到需要的人