Table of Contents
前言
當初決定要架一個部落格的時候
沒有直接去找託管網站
很直覺就想到找一台 VM 裝好 Docker 就來架
雖然託管不貴,但就是手癢想玩玩👀
過了一年半,這個站還是這個站
但整體已經是在最低成本下進化了
WordPress FPM 就是其中的一項改動
本篇是針對使用 WordPress 官方 Docker Image 的優化
⚠️⚠️⚠️
其餘的部署方式並不適用
前情提要
當時也寫了這篇【容器】在 VM 使用 Docker 架設 WordPress + Let’s Encrypt HTTPS
最初直接打開 Docker hub 直接搜尋 WordPress
看到結果,想都不用想就直接進入第一個
畢竟有十億次的下載次數
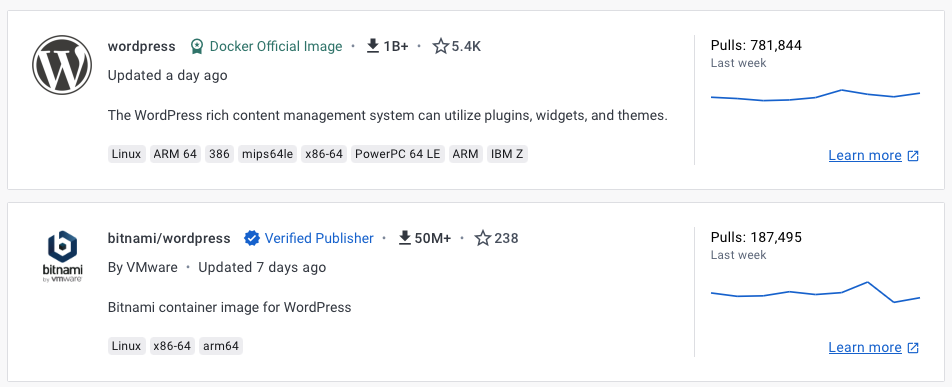
當初也沒有想太多
選了一個最基本的
docker pull wordpress在 Readme 中也有提供一個範例的 docker-compose
version: '3.1'

services:

  wordpress:
    image: wordpress
    restart: always
    ports:
      - 8080:80
    environment:
      WORDPRESS_DB_HOST: db
      WORDPRESS_DB_USER: exampleuser
      WORDPRESS_DB_PASSWORD: examplepass
      WORDPRESS_DB_NAME: exampledb
    volumes:
      - wordpress:/var/www/html

  db:
    image: mysql:5.7
    restart: always
    environment:
      MYSQL_DATABASE: exampledb
      MYSQL_USER: exampleuser
      MYSQL_PASSWORD: examplepass
      MYSQL_RANDOM_ROOT_PASSWORD: '1'
    volumes:
      - db:/var/lib/mysql

volumes:
  wordpress:
  db:
這也是看起來官方最推薦的方式
這樣的成功率最高
基本上只要 Domain 連的到容器
真的可以達到很多程式小白也能順利架站
還能優化什麼?
Web Server
如果是有網頁開發經驗的人
無論是前端、後端
應該會想問一件事
怎麼沒有 Web Server?
其實是有的,官方的 Docker Image
已經預先把 apache2 裝好,並在容器啟動時
會自動開始監聽 Port 80
下面是進到容器下 top 的結果
docker exec -it wordpress top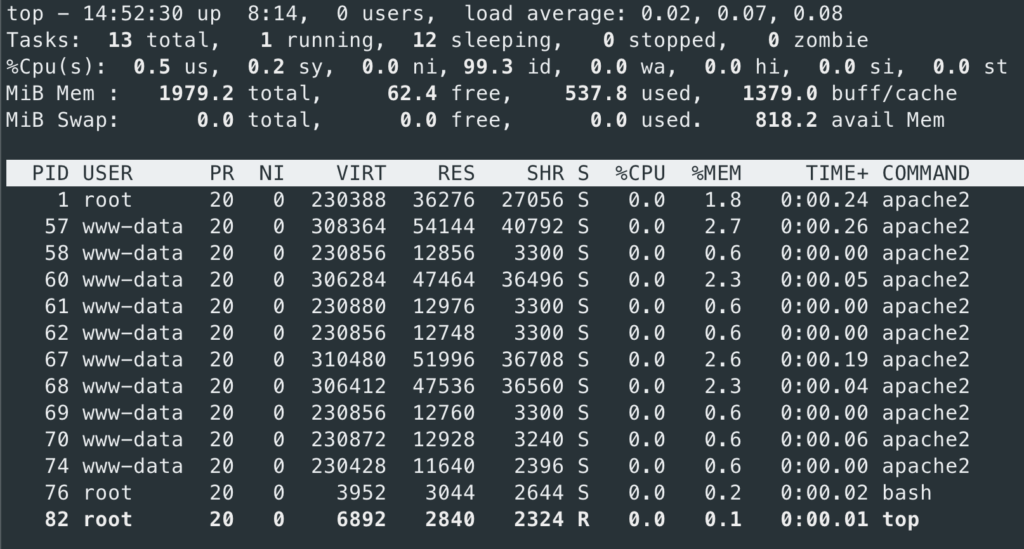
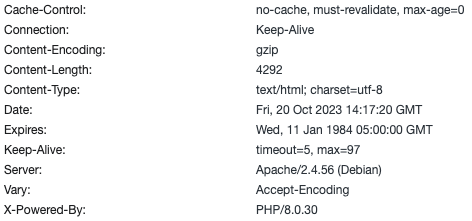
到瀏覽器使用開發者頁面看看也是透露一樣的資訊
額外包一層 Web Server 是必要的嗎?
這邊有幾點原因
- HTTPS
大部分教學都是推薦外掛比如 Really Simple SSL
筆者並沒有使用過,從說明上看起來的確是相當容易使用
但筆者並不熟悉 php 開發,外掛能少裝就少裝
外掛多,難免未來會需要去改 php
你說不會,誰知道呢?
- 轉址
跟上面差不多的理由
同樣也有很多外掛能夠協助這件事情
但我更傾向可以額外存一份 config
更易於管理
比如本站就做過一次的網址轉換
避免以前分享的連結失效,就得做轉址
大概會像下面這樣
location ~ /([0-9]+/[0-9]+/[0-9]+)/([a-z0-9-_]+)/([0-9]+)/([a-zA-Z]+)/ {
    set $catagory $2;
    set $post_id $3;
    rewrite ^ https://tocandraw.com/$catagory/$post_id/ permanent;
}

location ~ /([0-9]+/[0-9]+/[0-9]+)/([a-z0-9-_]+)/([a-z0-9-_]+)/([0-9]+)/([a-zA-Z]+)/ {
    set $catagory1 $2;
    set $catagory2 $3;
    set $post_id $4;
    rewrite ^ https://tocandraw.com/$catagory1/$catagory2/$post_id/ permanent;
}
比起用網頁介面管理轉址
我更傾向使用這種方式
- 共用 Domain
這一點因人而異
像筆者就會覺得一個網域只用在一個站
這真是浪費,畢竟對外 IP 數量有限,價格也不便宜
通常有這個需求的人
不外乎有這幾個理由
- 還有額外的
Web需要服務 - 有另外的後端服務也需要對外
這種時候就不太可能依賴 WordPress 中的外掛
只有自己架設的 Web Server 能夠滿足
下面就來説説再包一層的做法
NGINX
筆者相對熟悉的 Web Server 是 nginx
所以除了 mariadb、wordpress 之外
就會再起第三個容器 nginx
但如果各位熟悉 apache2
並且也不用依靠 WordPress 上的插件
就可以把 SSL 憑證帶入
那我覺得已經很棒了
這篇優化就是看看就好
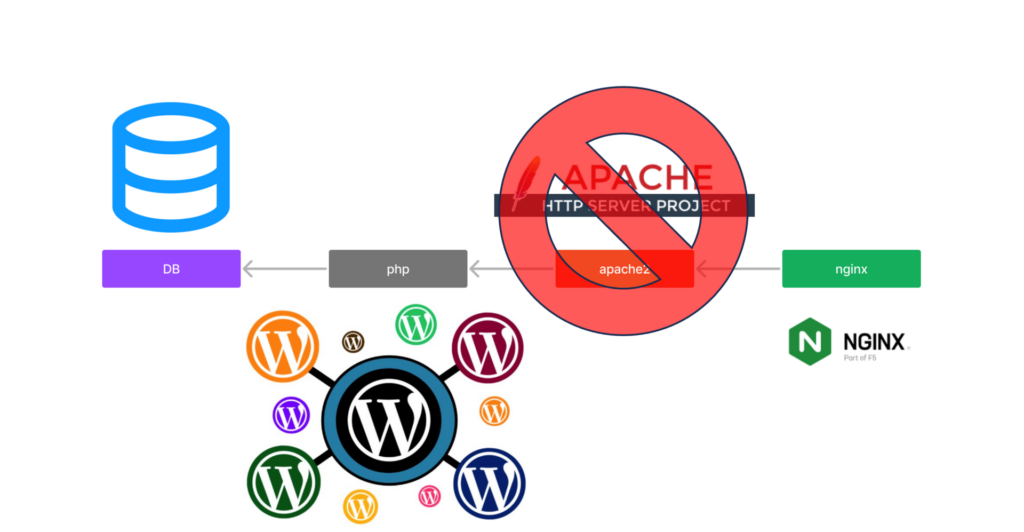
來把現在的架構畫出來看看
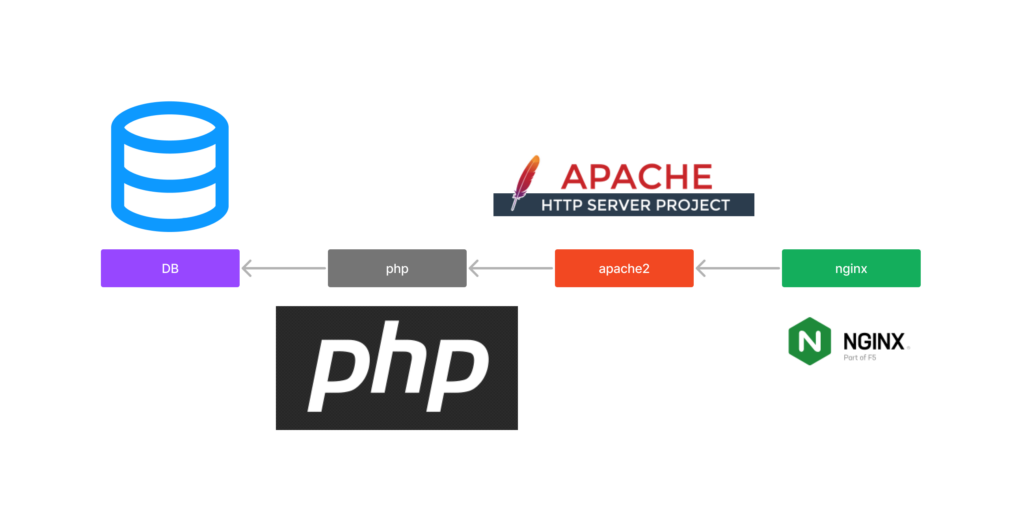
如果決定把憑證、轉址都放在 nginx 的情況下
中間的 apache2 就顯得非常雞肋
他只是原封不動的把 nginx 送下來的請求
完成並且回傳
這些事情 nginx 自己都能做到
為什麼還要多一個人接力呢
所以我想要把 apache2 拔掉
變成下面這樣
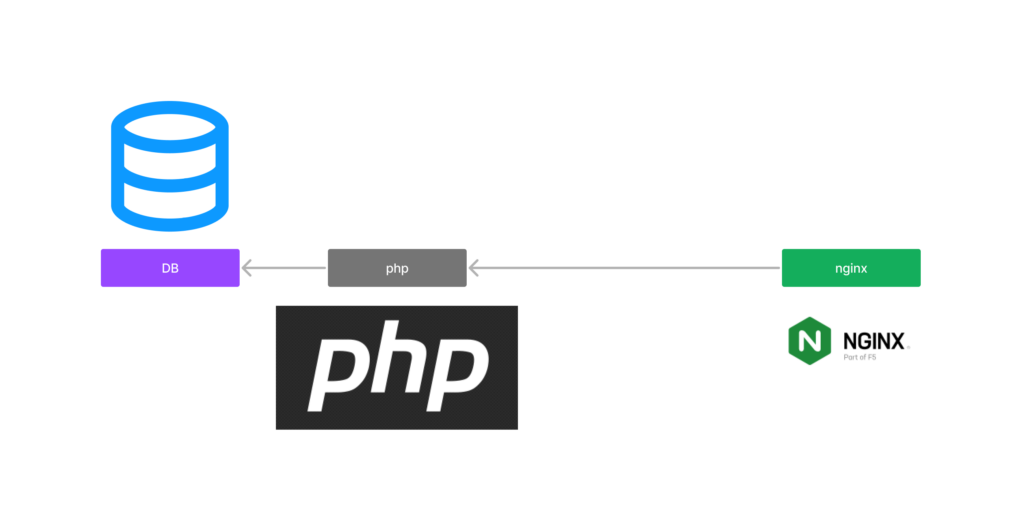
看起來是不是比較合理一些
其實官方也想到會有人有這個需求
他們是有提供對應的 image 的
下面來進到今天標題裡的主角
WordPress:FPM
This variant contains PHP-FPM, which is a FastCGI implementation for PHP. See the PHP-FPM website for more information about PHP-FPM.
In order to use this image variant, some kind of reverse proxy (such as NGINX, Apache, or other tool which speaks the FastCGI protocol) will be required.
https://hub.docker.com/_/wordpress
這邊官方幫我們把 php 的部分裝上了 PHP-FPM
至於什麼是 PHP-FPM
來看一下說明
總而言之
對我們的影響就是『快』
當最重要的是讓我們可以『繞過』 apache2
直接訪問 WordPress 的 fastcgi
下面就來看一下如何在 nginx 上實現
server {
    listen 80;
    listen [::]:80;
    server_name 127.0.0.1;

    index index.php index.html index.htm;
    root /var/www/html;

    server_tokens off;
    client_max_body_size 75M;

    location / {
        try_files $uri $uri/ /index.php$is_args$args;
    }

    location ~ \.php$ {
        try_files $uri = 404;
        fastcgi_split_path_info ^(.+\.php)(/.+)$;
        fastcgi_pass wordpress:9000;
        fastcgi_index index.php;
        include fastcgi_params;
        fastcgi_param SCRIPT_FILENAME $document_root$fastcgi_script_name;
        fastcgi_param PATH_INFO $fastcgi_path_info;
    }

    location ~ /\.ht {
        deny all;
    }
}
這邊有一點需要說明
其中的 Port 9000 是預設 FastCGI 使用的 Port
就不特別去更動,反正只是在容器內部
上面的 config 僅是在沒有 HTTPS 的情況下用 Port 80 演示
在這種情況下 server_name 要特別注意
必須要跟我們在瀏覽器中輸入的一致
否則將會進不去
進步多少?
這邊我們用一個簡單的小工具 ApacheBench 來做一下測試
測試環境都是一個全新的站
差別在於有無使用 fpm
有 fpm 的這組使用 fastcgi_pass
無 fpm 的這組使用 proxy_pass
Benchmark 指令
ab -n 10000 -c 100 http://127.0.0.1/模擬 100 個使用者,每個製造 10000 個 request
無 fpm 結果
Server Software:        nginx/1.25.2
Server Hostname:        127.0.0.1
Server Port:            80

Document Path:          /
Document Length:        0 bytes

Concurrency Level:      100
Time taken for tests:   22.993 seconds
Complete requests:      10000
Failed requests:        0
Non-2xx responses:      10000
Total transferred:      3530000 bytes
HTML transferred:       0 bytes
Requests per second:    434.91 [#/sec] (mean)
Time per request:       229.930 [ms] (mean)
Time per request:       2.299 [ms] (mean, across all concurrent requests)
Transfer rate:          149.93 [Kbytes/sec] received

Connection Times (ms)
              min  mean[+/-sd] median   max
Connect:        0    0   0.3      0       3
Processing:     3  229 164.1    178    1206
Waiting:        2  229 164.1    178    1206
Total:          3  229 164.1    178    1207
有 fpm 結果
Server Software:        nginx
Server Hostname:        127.0.0.1
Server Port:            80

Document Path:          /
Document Length:        0 bytes

Concurrency Level:      100
Time taken for tests:   15.747 seconds
Complete requests:      10000
Failed requests:        0
Non-2xx responses:      10000
Total transferred:      3270000 bytes
HTML transferred:       0 bytes
Requests per second:    635.06 [#/sec] (mean)
Time per request:       157.465 [ms] (mean)
Time per request:       1.575 [ms] (mean, across all concurrent requests)
Transfer rate:          202.80 [Kbytes/sec] received

Connection Times (ms)
              min  mean[+/-sd] median   max
Connect:        0    0   0.3      0       4
Processing:    11  157  15.8    154     299
Waiting:        8  157  15.8    154     299
Total:         11  157  15.9    154     302
可以看到在幾項比較容易看出區別的項目
都是在 fpm 下完勝
但要注意一下,這邊儘量都要使用同一台電腦測試
數字也並不是絕對數字,而是去比較一個差距
Time per request: 157.465 [ms] < 229.930 [ms], FPM 每次 request 到 response 快了 73ms 左右🏆Requests per second: 635.06 [#/sec] > 434.91 [#/sec], FPM 每秒可以多出 200 次 request🏆
總結
這篇是優化篇的第一篇
展示了一個現代大多數人比較熟悉的 Docker
在官方提供的 image 前提下
如何達到最高的效能
之後全部的優化寫完之後
還會有一篇是使用優化後的流程去架一個站